Models
AntiCP 3.0 uses two prediction models:
- Finetuned-ESM2 + BLAST
- Finetuned-ESM2
Predict
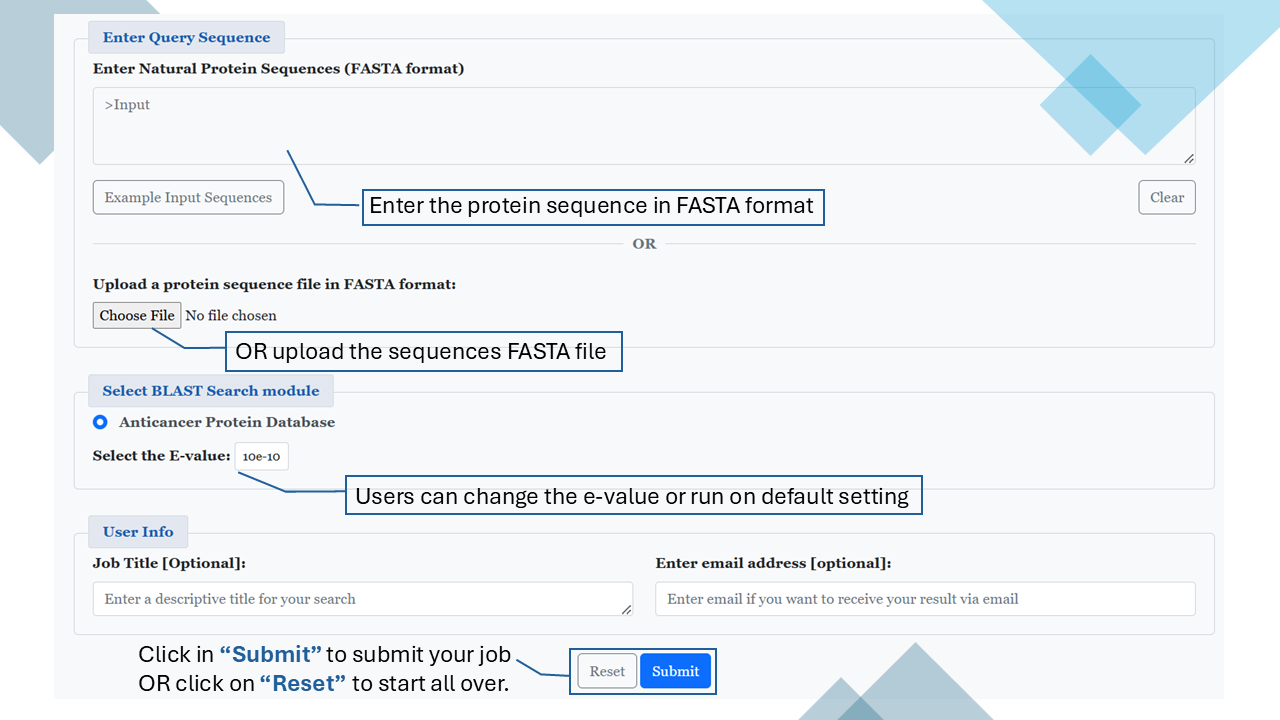
This module enables users to predict anticancer proteins with ease. Users can input sequences in one of the following ways:
- Type or paste single/multiple peptides in FASTA format directly into the query box.
- Upload a file containing sequences in FASTA format.
- Finetuned ESM2 + BLAST (default option).
- Finetuned ESM2
- Hydrophobicity
- Steric hindrance
- Molecular weight
- Net charge
- And more

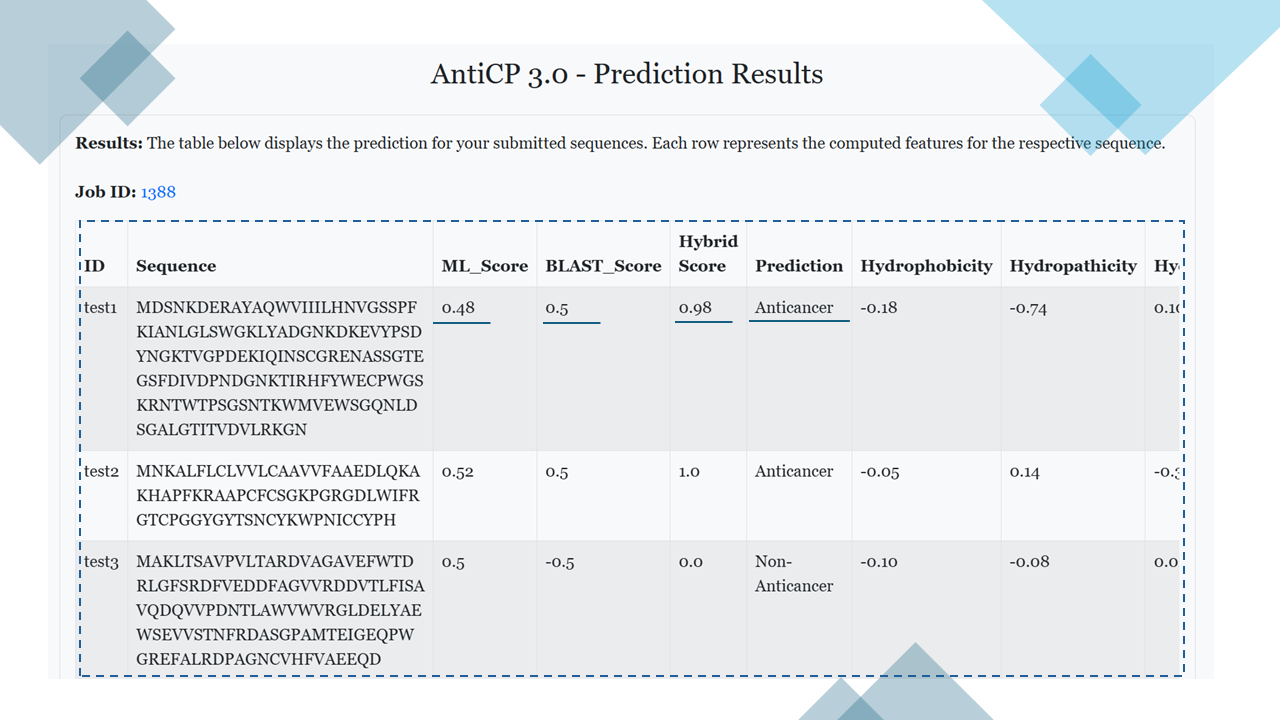
Prediction Result
After the prediction, the results are displayed in a tabular format (see figure below). The information displayed depends on the selected prediction model:- Hybrid Model: The table includes the following columns:
- ML_Score
- BLAST_Score
- Hybrid_Score
- Prediction
- All selected properties (e.g., hydrophobicity, molecular weight, etc.).
- Model 1: The table includes:
- ML_Score
- Prediction
- All selected properties (e.g., hydrophobicity, molecular weight, etc.).
BLAST
This module enables users to search a query protein sequence against the database of known anticancer and non-anticancer proteins using a similarity-based search method, i.e. BLAST. The module predicts the query sequence as:
- Anticancer: If a match (hit) is found in the database.
- Non-Anticancer: If no match (hit) is found in the database.
BLAST Result
Based on the hit, each submitted sequence is given a prediction. Users can also view the detailed BLAST alignment results.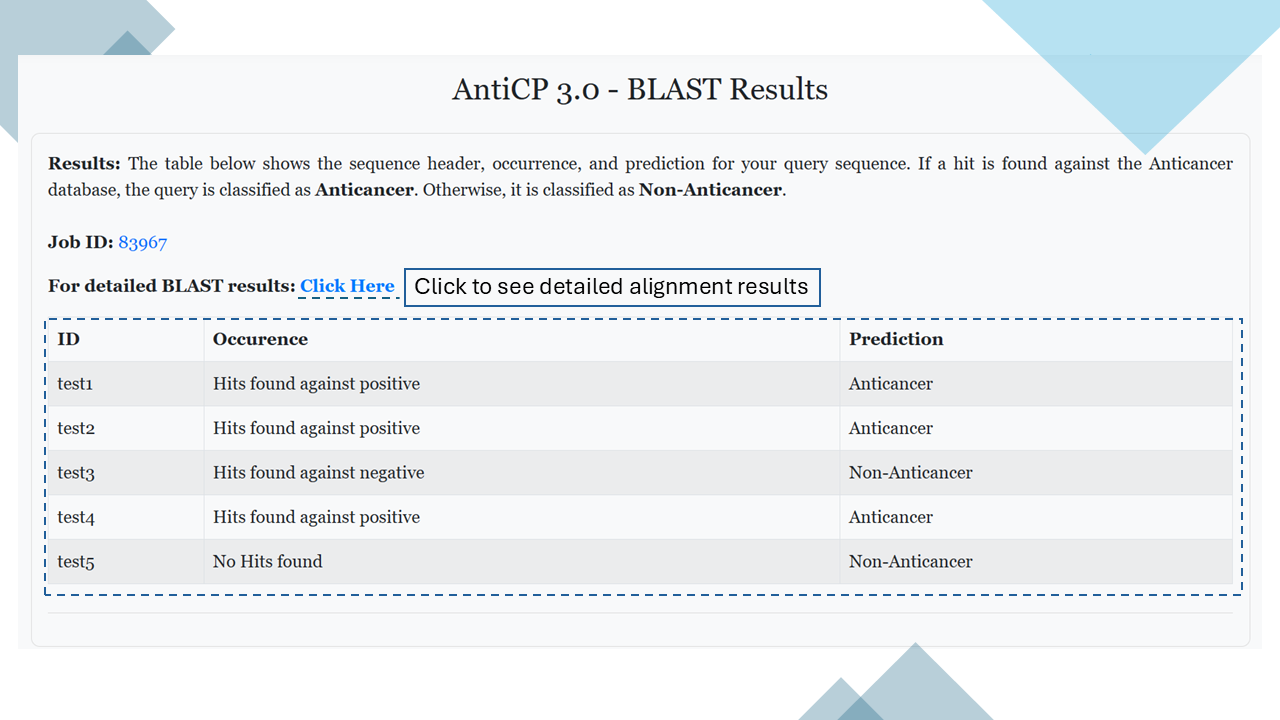
Standalone
Installation and Usage
- Navigate to the Download tab.
- Download the standalone version: Anticp3.zip. Note: If you do not have Anaconda installed on your system, you can download and install it from Miniconda Installation Guide.
- Open your terminal and navigate to the directory where the file was downloaded.
- Unzip the standalone file using the following command:
unzip anticp3.zip - Change to the anticp3_standalone directory:
cd anticp3_standalone - Set up the conda environment by running:
conda env create -f environment.yml - Activate the environment:
conda activate anticp3 - Run the Python script:
python3 anticp3.py -h
Your environment is now set up, and you can begin using the Anticp3 standalone on your system.
Pip Package
Install the official AntiCP 3.0 Python package directly from PyPI for seamless integration into your workflows.
Installation Command:
pip install anticp3Once installed, you can use the prediction module directly in your Python scripts or terminal.
Visit our PyPI Page for full documentation and updates.
HuggingFace Model
Access the fine-tuned AntiCP 3.0 model on Hugging Face for quick inference and experimentation.
Model Page:
Example Code to Load the Model:
from transformers import AutoModelForSequenceClassification, AutoTokenizer

model = AutoModelForSequenceClassification.from_pretrained("raghavagps-group/anticp3")
tokenizer = AutoTokenizer.from_pretrained("raghavagps-group/anticp3")

sequence = "MANCVVGYIGERCQYRDLKWWELRGGGGSGGGGSAPAFSVSPASGLSDGQSVSVSVSGAAAGETYYIAQCAPVGGQDACNPATATSFTTDASGAASFSFVVRKSYTGSTPEGTPVGSVDCATAACNLGAGNSGLDLGHVALTFGGGGGSGGGGSDHYNCVSSGGQCLYSACPIFTKIQGTCYRGKAKCCKLEHHHHHH"

# Tokenize and run inference
inputs = tokenizer(sequence, return_tensors="pt", truncation=True)

with torch.no_grad():
    logits = model(**inputs).logits
    probs = torch.nn.functional.softmax(logits, dim=-1)
    prediction = torch.argmax(probs, dim=1).item()

labels = {0: "Non-Anticancer", 1: "Anticancer"}
print("Prediction:", labels[prediction])
This allows you to use AntiCP 3.0 inside any deep learning pipeline easily!