Installing OSSDlinux on VirtualBox
This page facilitate users in installing OSDDlinux on their existing machines via virtual box. User should install virtual box on their computer then he/she can install OSDDlinux in virtual box. Following is brief description ...
Downloading Virtual Box
Virtual Box is a virtualization application which runs across cross-platforms. To Download Virtual box visit the download page of virtual box. Go to the VirtualBox website and go to the download section. There are versions available for Windows, Mac, and Linux.
Installation of Virtual Box
If a user doesn't want to install OSDDlinux directly on the machine, he/she can install virtual box and proceed for installing OSDDlinux on virtual machine. User should follow below steps to install virtual box on their machine.
- Windows users can install VirtualBox by double clicking on the downloaded exe file and follow the instructions thereafter.
- Mac users can install VirtualBox by double clicking on the downloaded dmg file and follow the instructions thereafter.
- Linux users with 64-bit architecture can install VirtualBox using a downloaded deb file with following command which is to be run on terminal "sudo dpkg -i virtualbox-4.2_4.2.18-88780~Ubuntu~precise_amd64.deb".
- Linux users with 32-bit architecture can install VirtualBox using a downloaded deb file with following command which is to be run on terminal "sudo dpkg -i virtualbox-4.2_4.2.18-88780~Ubuntu~precise_i386.deb".
Configuring Virtual machine in Virtual Box
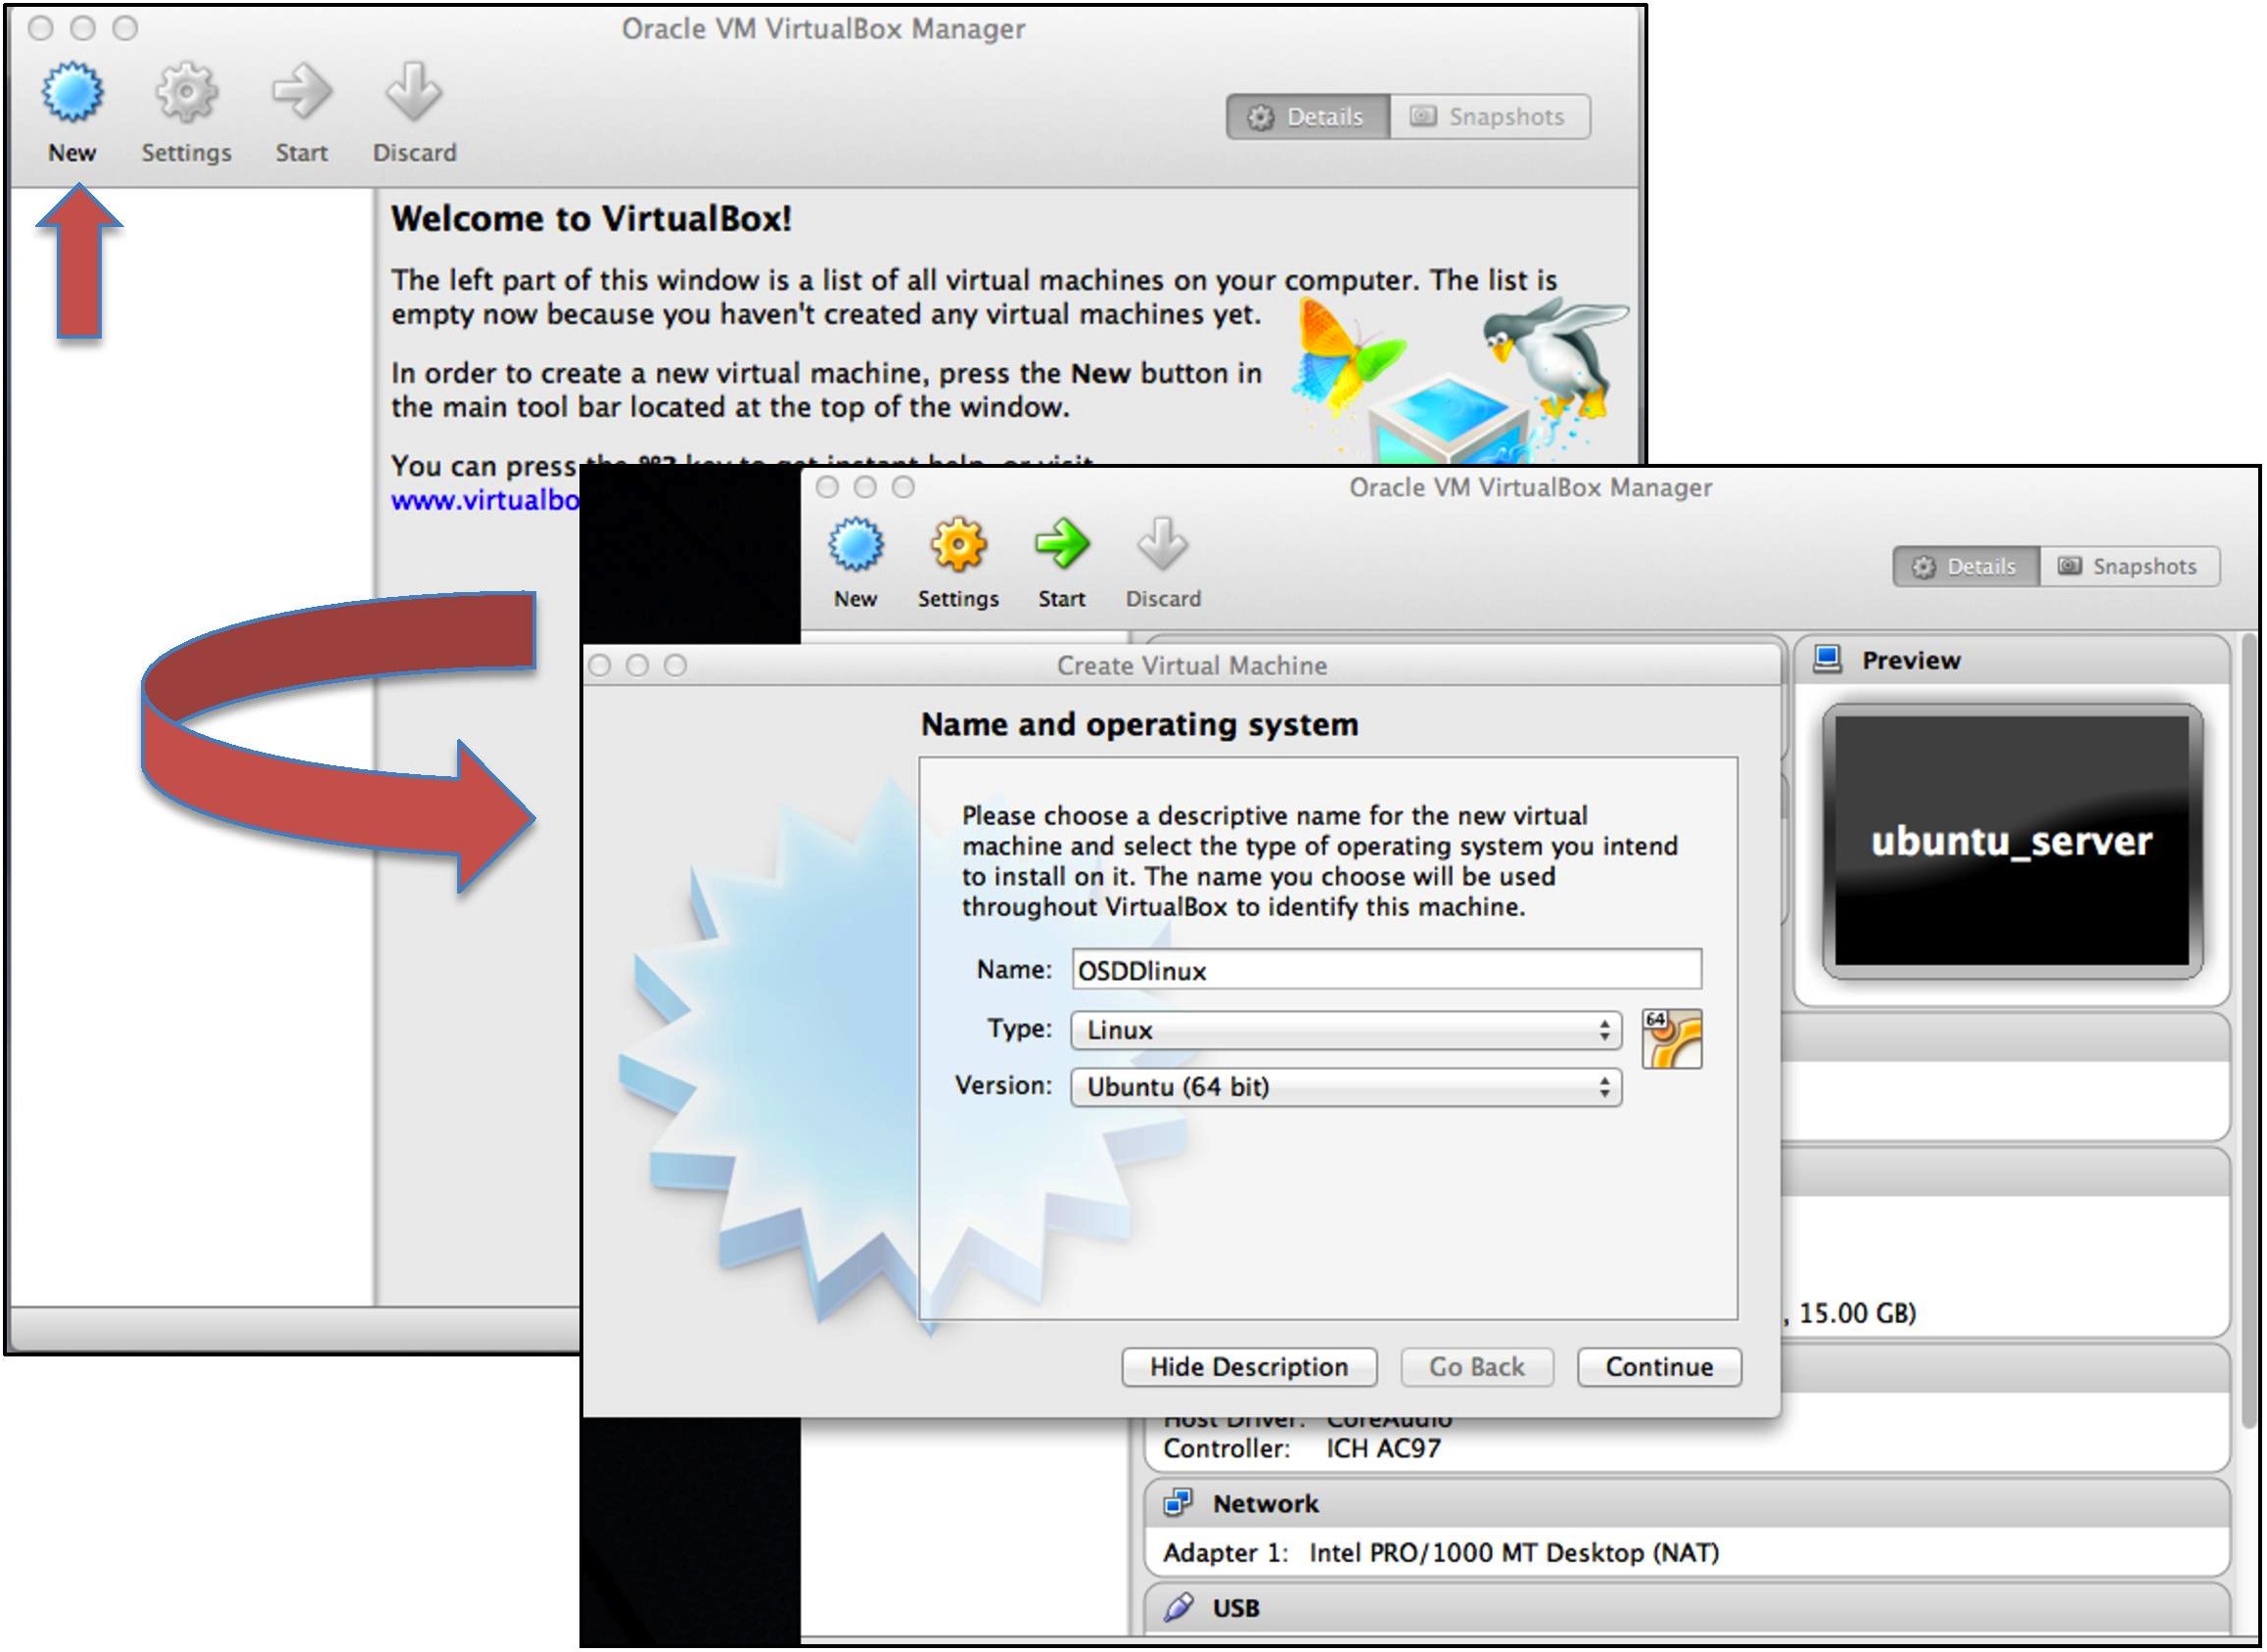
- In VirtualBox, click the New button to start the virtual machine wizard.
- Give your virtual machine a name (such as OSDDlinux) and select the operating system (Ubuntu 64 or Ubuntu) according to the host system architecture for the machine as shown in the figure below
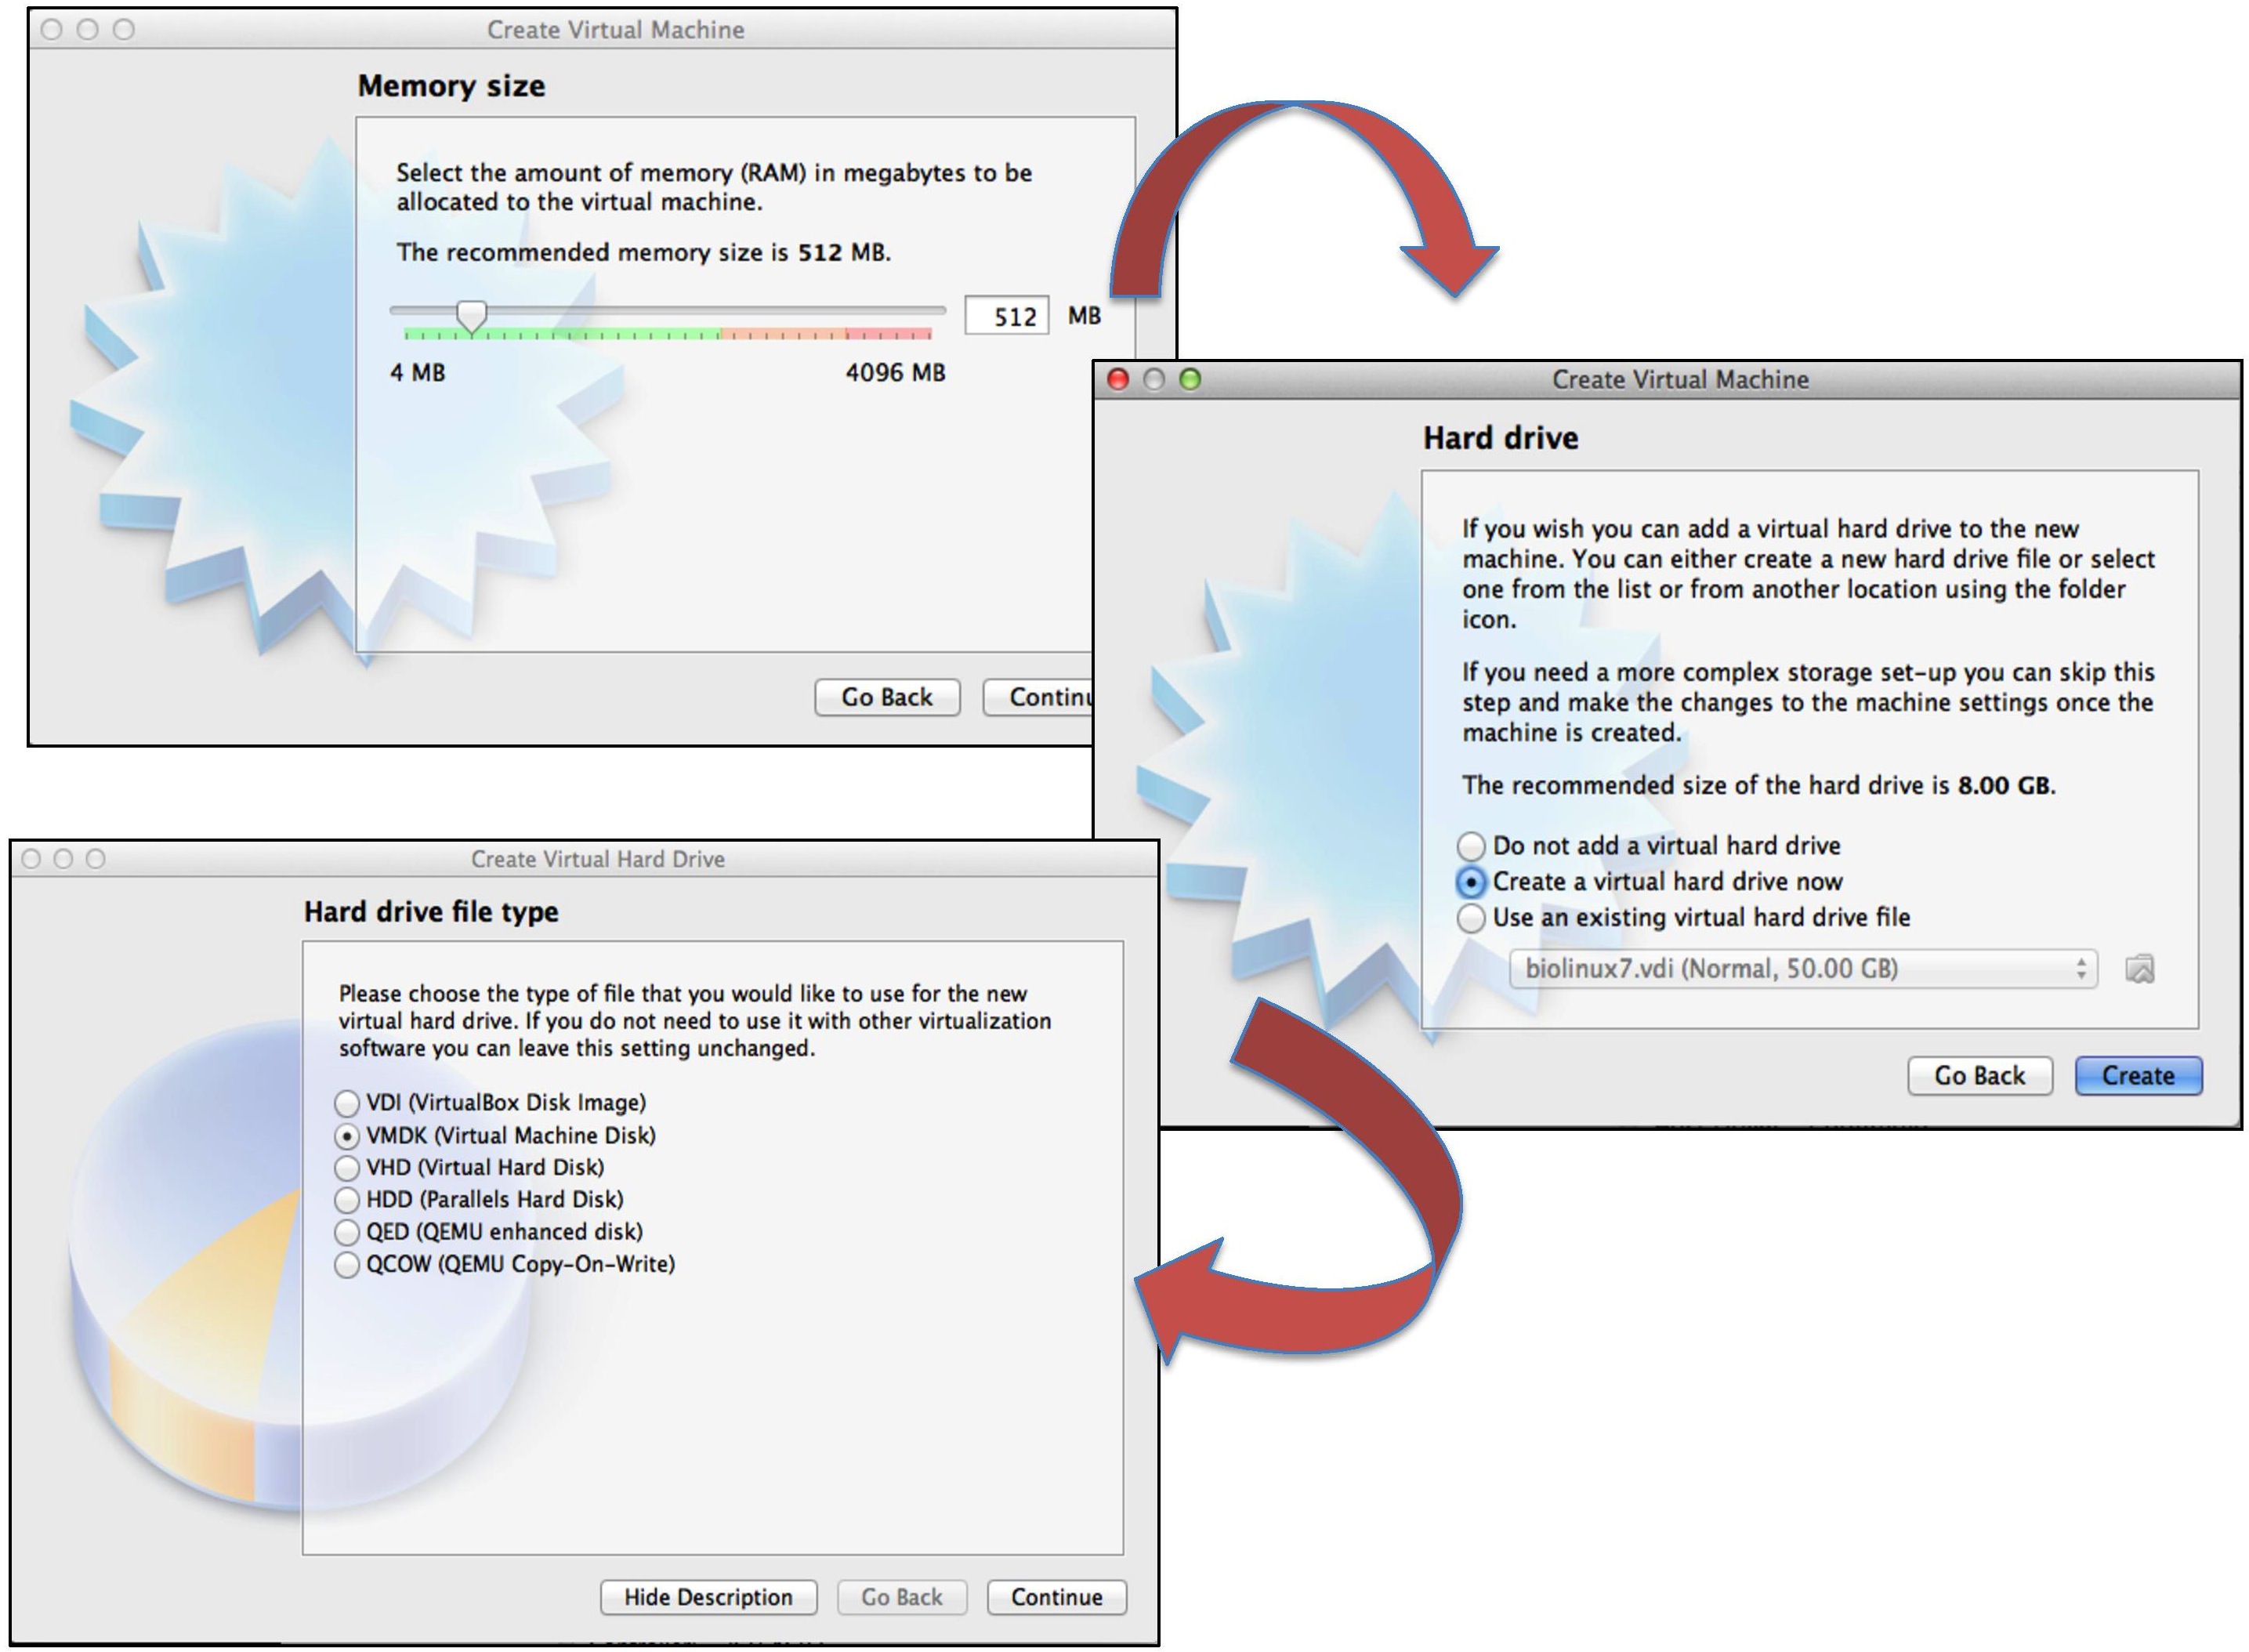
- Select the amount of memory your VM will use. When you chose your operating system in the previous step, virtualBox automatically recommends the proper amount of memory to use. If you feel this amount is not correct, you can move the slider or type a new amount in the box. Click Continue when you are done.
- Select the option "Create a virtual hard drive now" and click on "Create".
- Choose the hard drive file type option. VDI file type works only on virtual box application, other file types like VMDK also works on other virtualization softwares
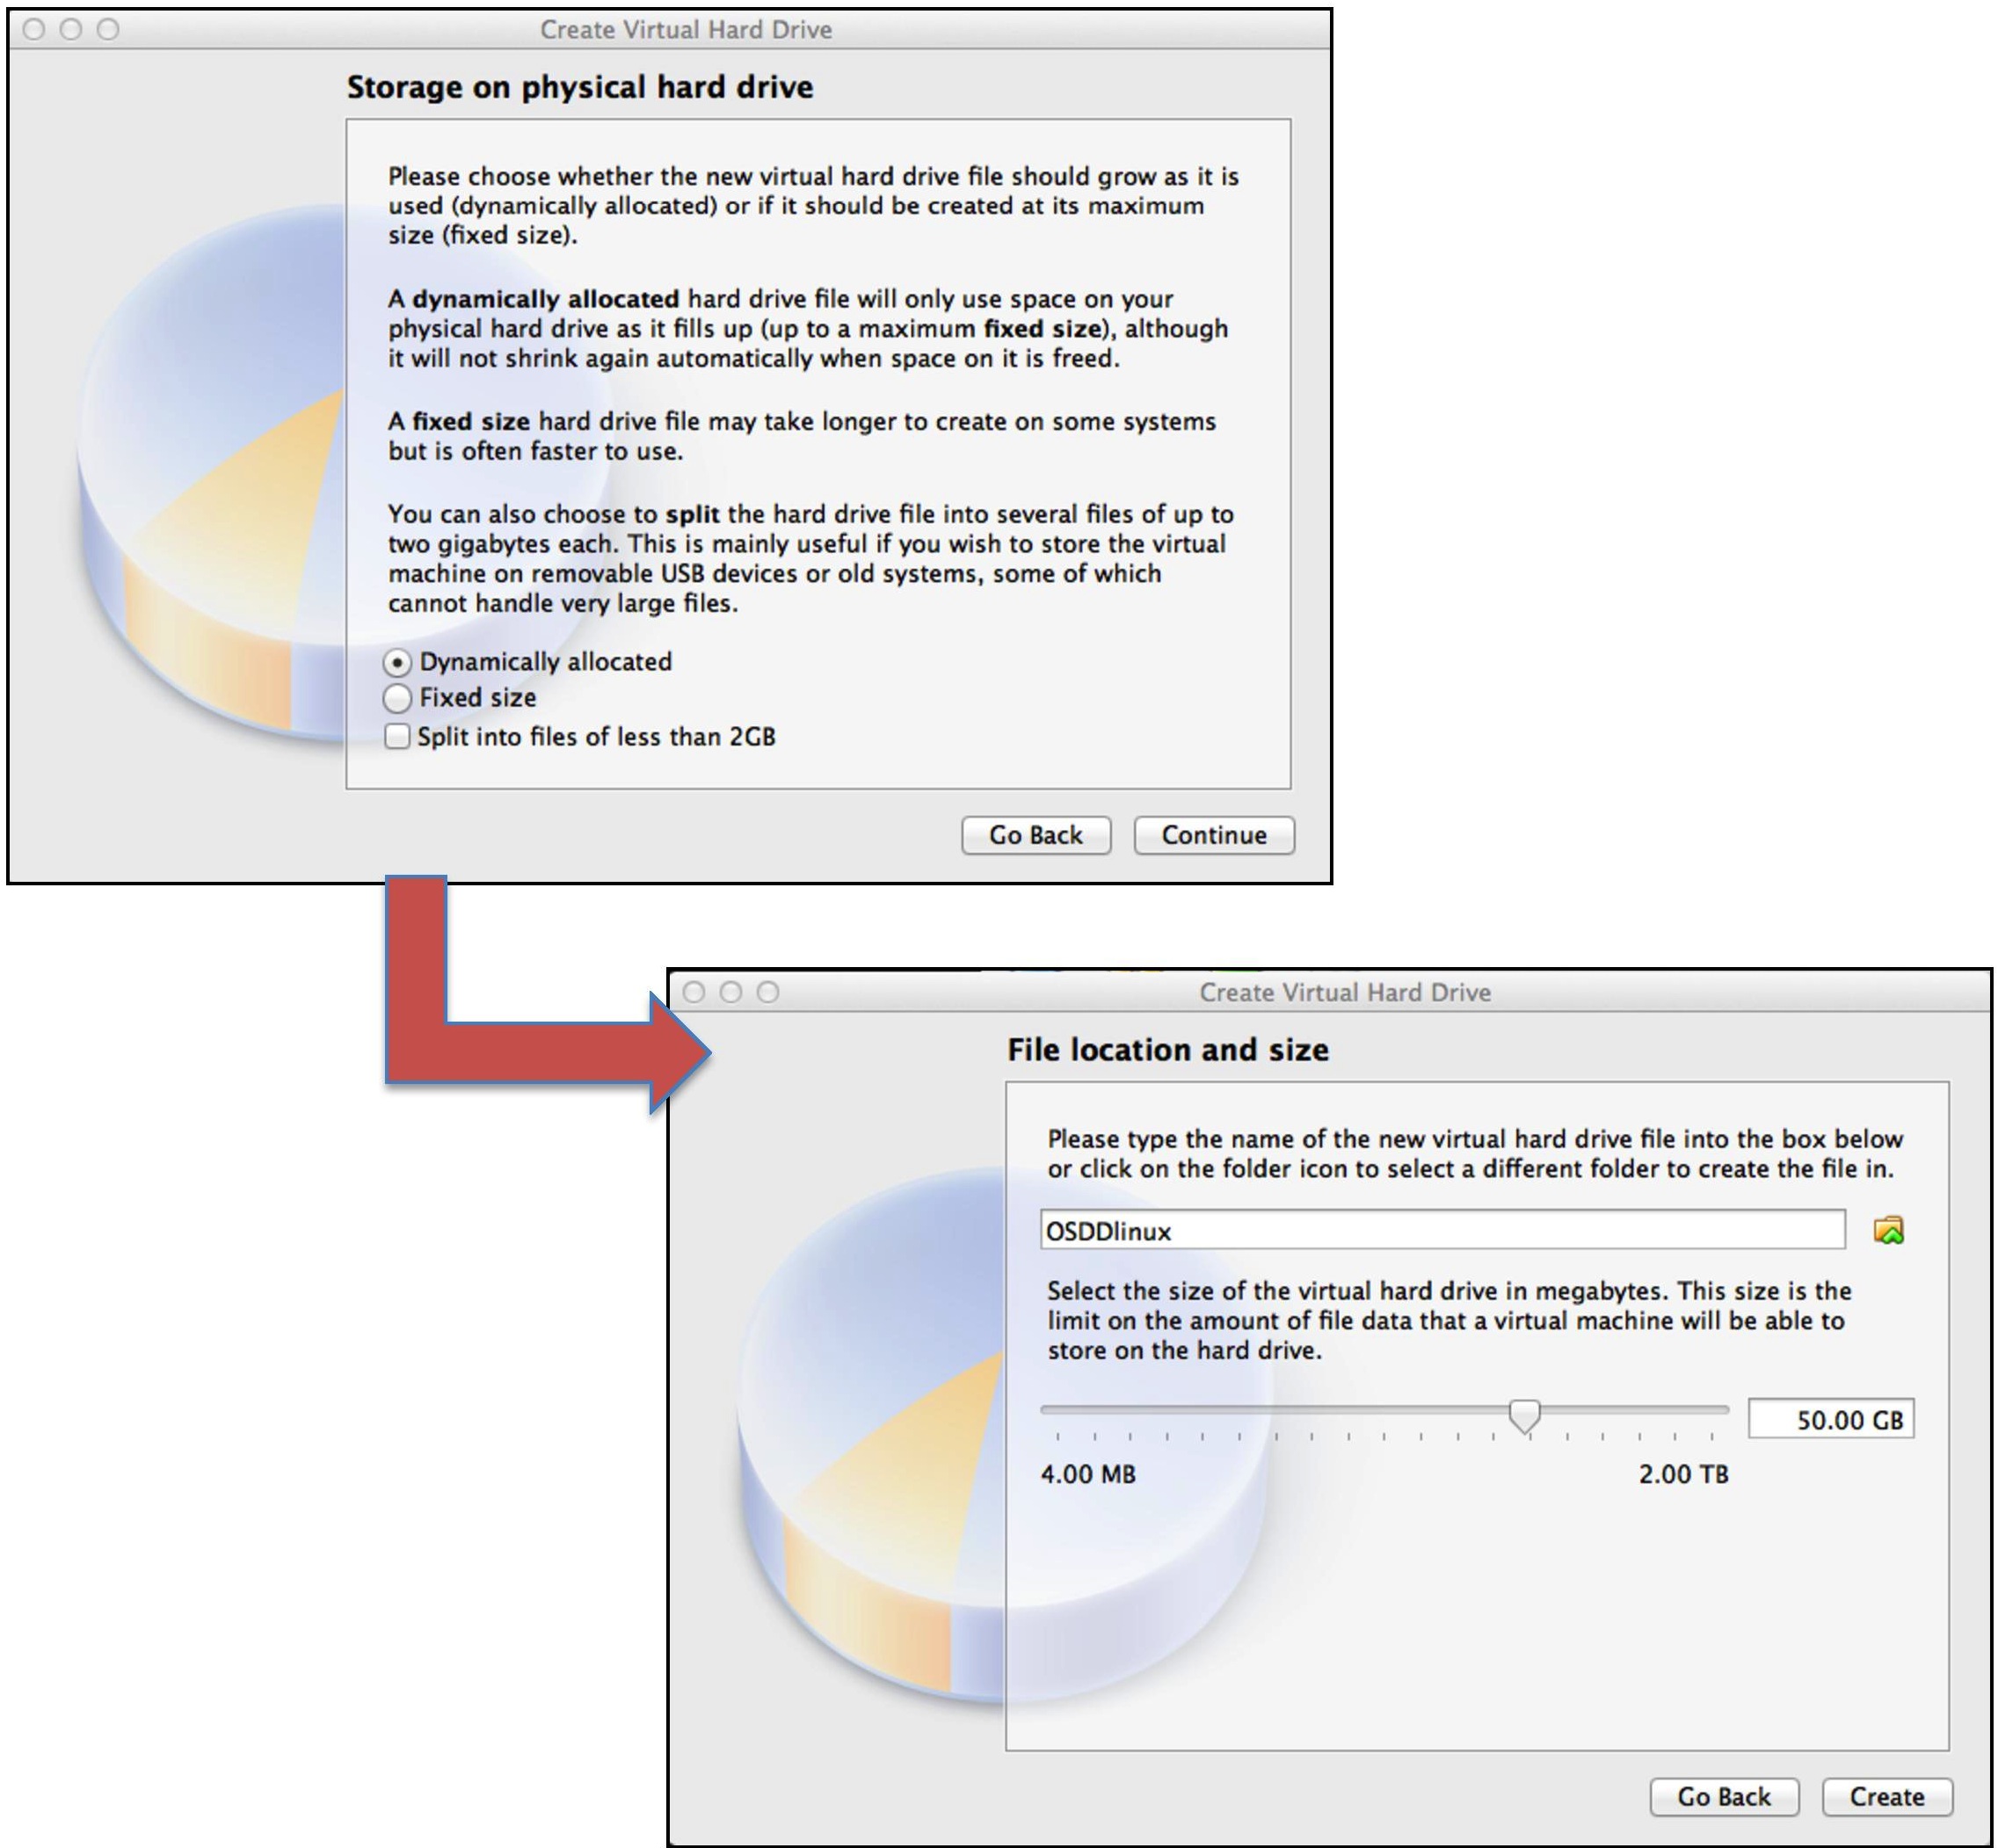
- Select either Fixed-Size Storage or Dynamically Expanding Storage depending upon your needs. A fixed size storage is going to be the size of the virtual hard disk on the host OS (e.g. :- a virtual disk 8 GB will be 8 GB on the host OSs hard disk). A dynamically expanding storage will be only the size of Ubuntu on your hard disk, but will grow in size as files are added to it until it reaches its limit.
- Enter the name and size of the virtual hard disk.
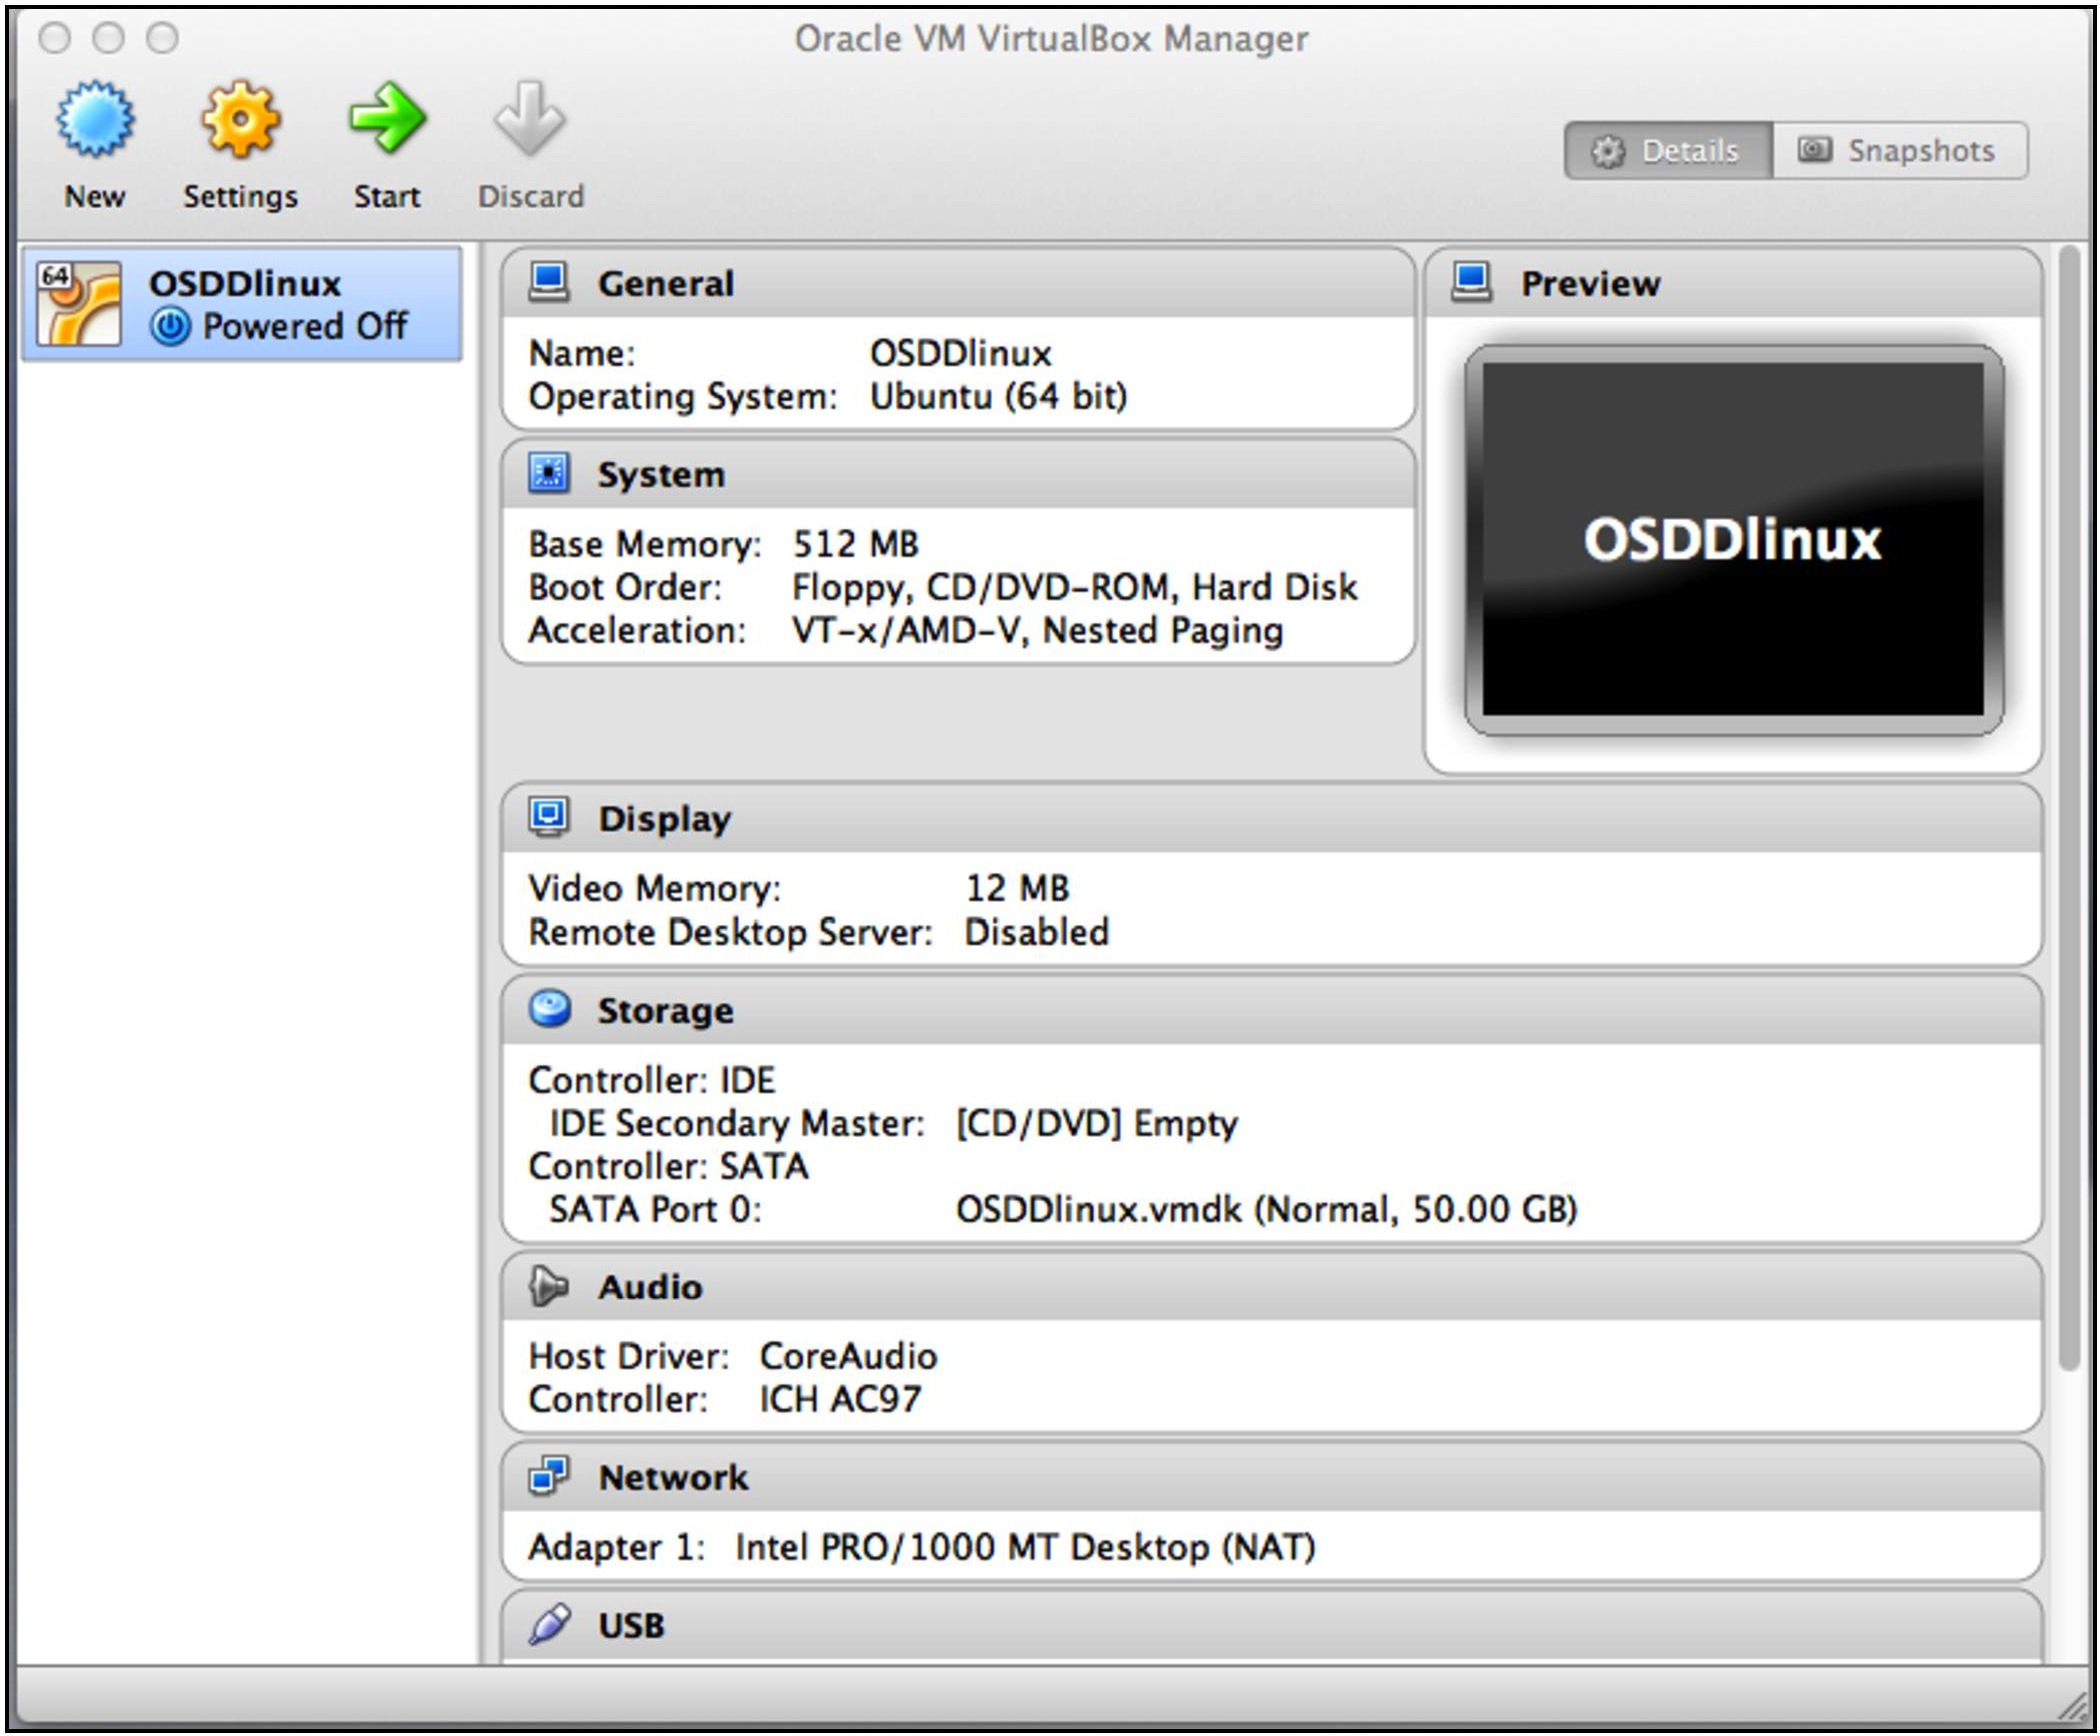
- Your virtual machine is created and you can see your new virtual machine name in the list.
Downloading OSDDlinux iso file
User should download one of the following types of OSDDlinux ISO images available for installation
64-bit Architecture
32-bit Architecture
Installing OSDDlinux in Virtual Machine
After installing virtual box, user should follow steps given below to install OSDDlinux in virtual box. (NOTE: After successfull installation of OSDDlinux, users may require passwords which are :- password for sudo: osddlinux; password for root: osddlinux).
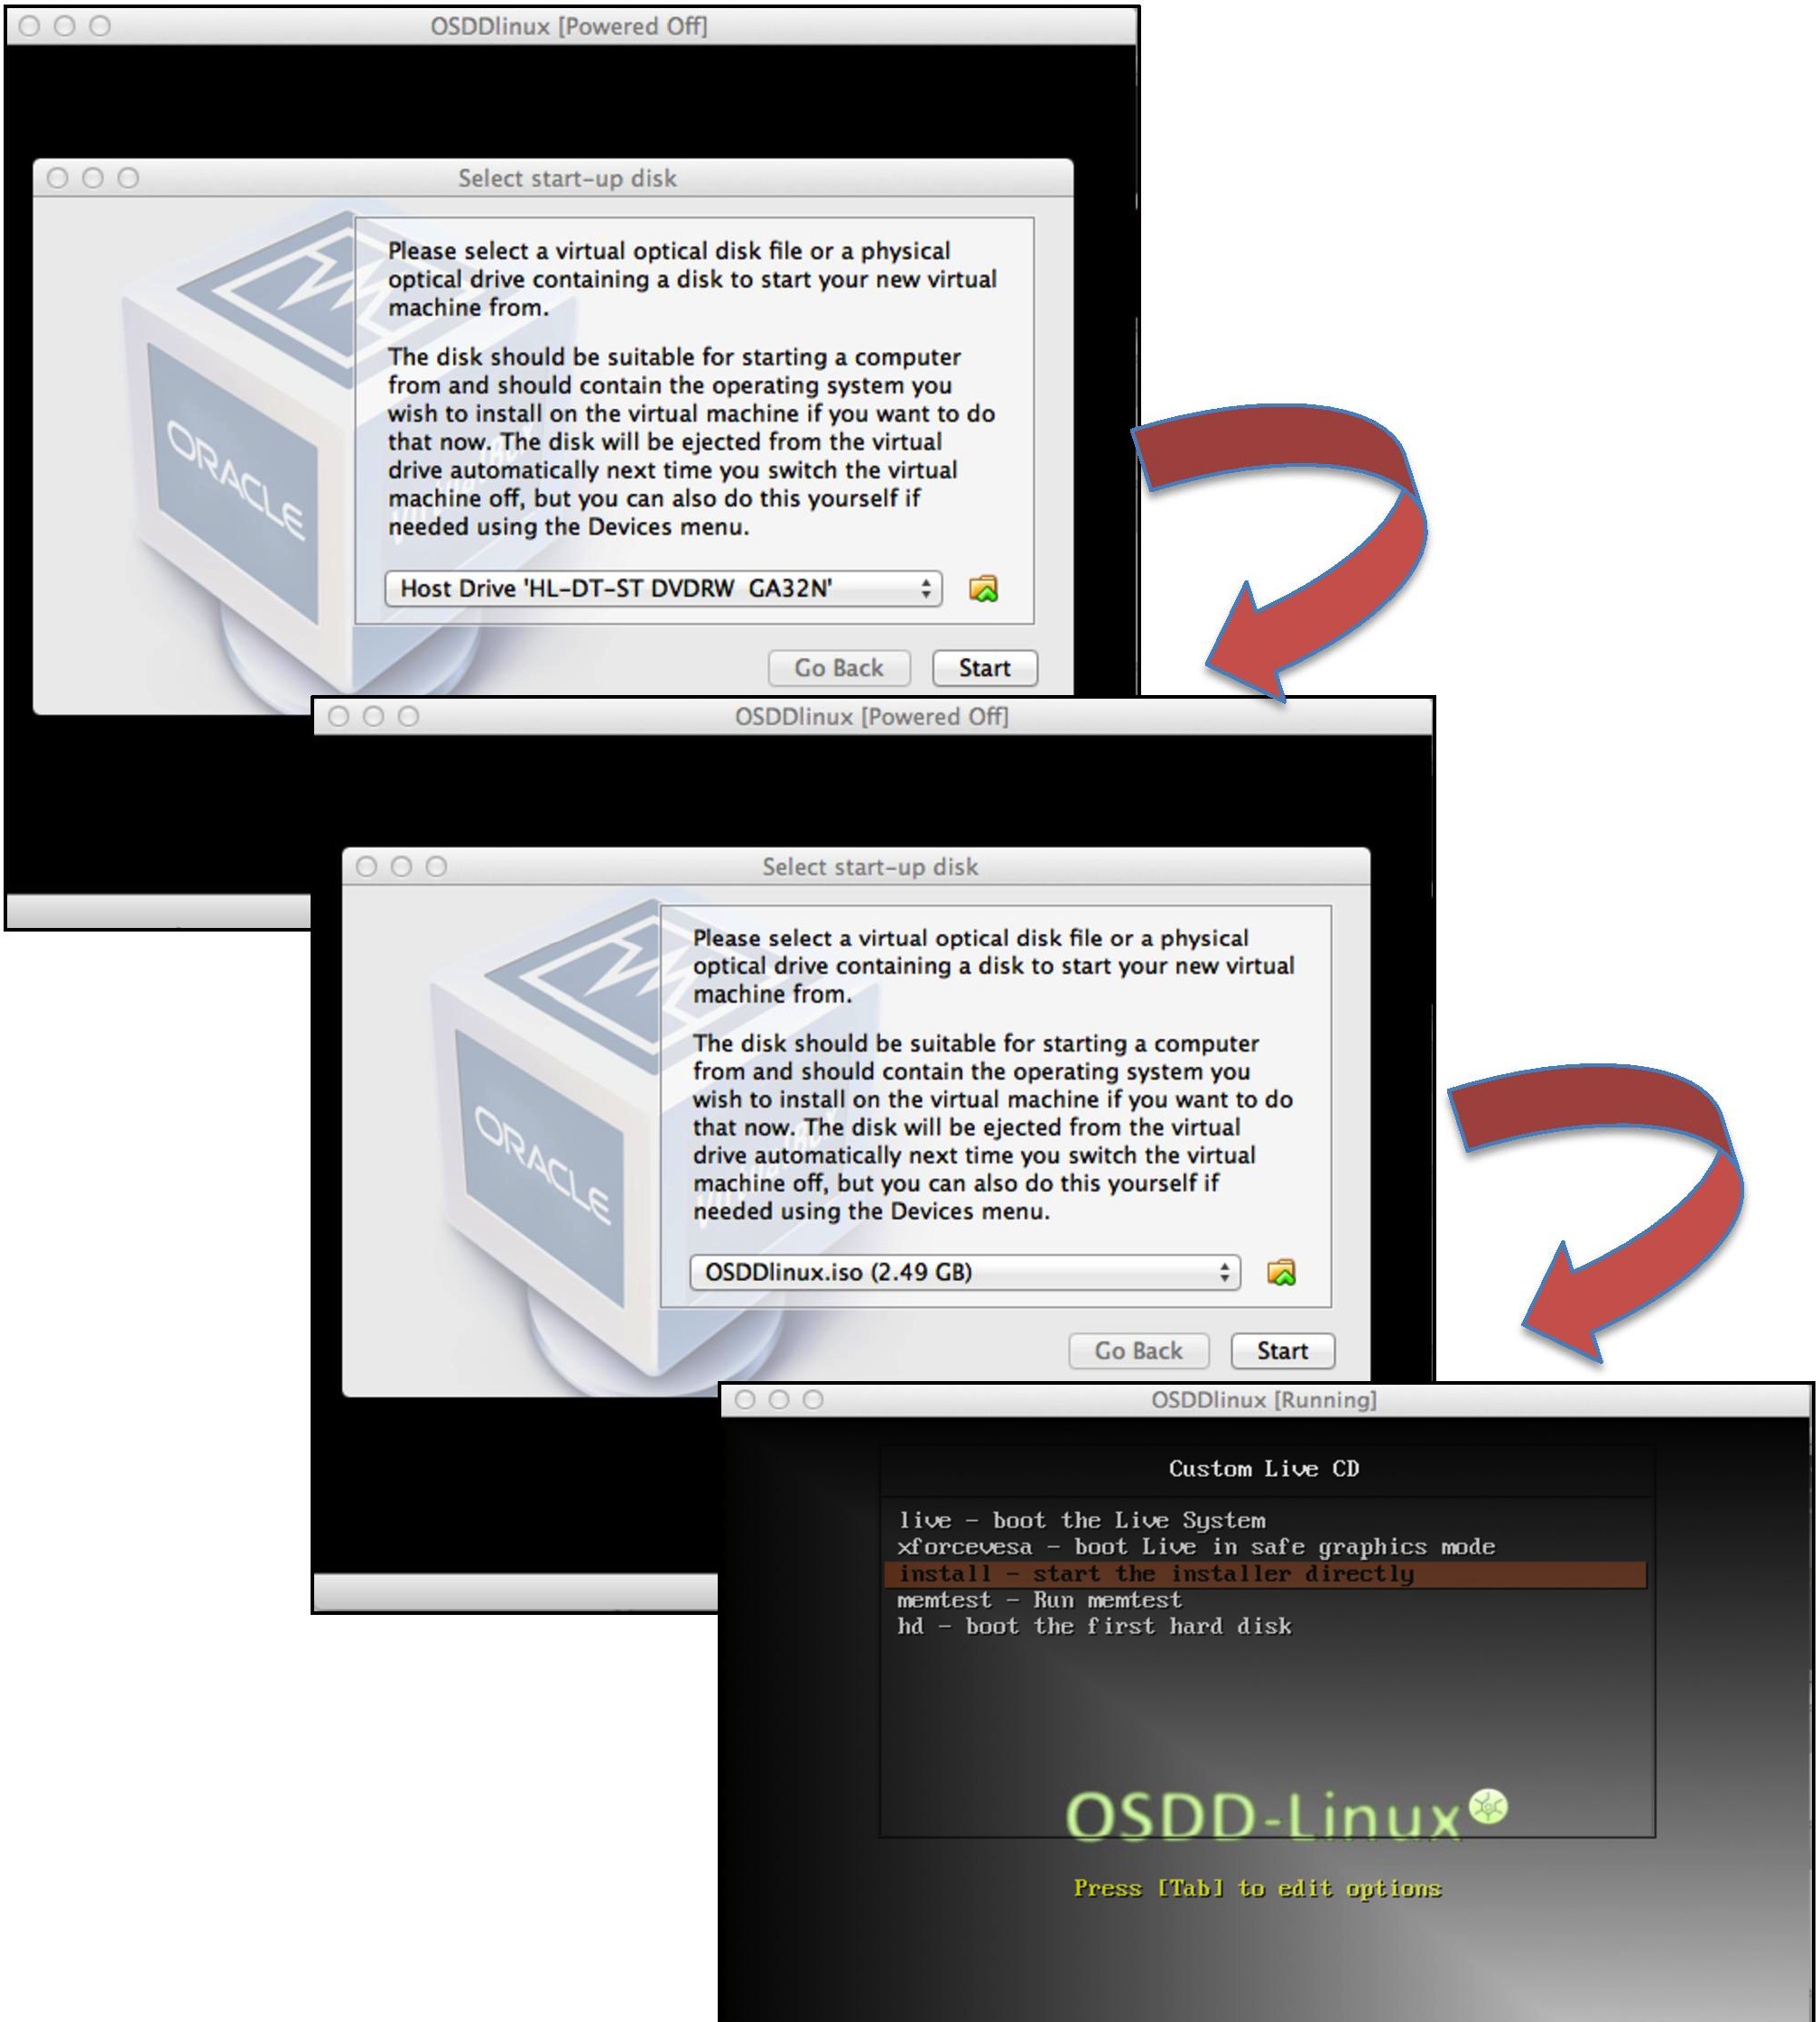
- Click on the green start button to start the OSDDlinux virtual machine.
- Browse the OSDDlinux iso file downloaded on your computer and upload it.
- Now you will get install options for OSDDlinux as displayed in the figure below
- Follow the instructions on the screen for full installation of OSDDlinux.
NOTE: If you have installed Minimum infrastructure of OSDDlinux (i.e. OSDDlinux_base), after installation you need to follow special instructions to upgrade to OSDDlinux_full version. Click here to follow the instructions.
Upgrade OSDDlinux_base to OSDDlinux_full version
This section is designed for users who have installed OSDDlinux_base in their machine. OSDDlinux_base provides minimum architecture with minimum software packages and needs to be upgraded in order to use all the software packages which comes in OSDDlinux_full version. This page provides step by step instructions for upgradation.
Steps to upgrade:
- Using downloaded tar files
- Download the compressed tar files of additional packages (in the form of .tar.gz) from the following link http://osddlinux.osdd.net/download/ubuntu/64bit/packages/additional
- Copy the following downloaded files in /gpsr/ directory
data.tar.gz galaxy.tar.gz models.tar.gz webserver.tar.gz
- uncompress and detar the files in /gpsr/ directory using following command
tar -zxvf data.tar.gz galaxy.tar.gz models.tar.gz webserver.tar.gz
- Using rsync option
- Use following command to copy additional packages for upgradation
rsync -avz osddlinux.osdd.net::osddlinux/ubuntu/64bit/packages/* /gpsr/
- Following files will be copied in /gpsr/ directory
data.tar.gz galaxy.tar.gz models.tar.gz webserver.tar.gz
- uncompress and detar the files in /gpsr/ directory using following command
tar -zxvf data.tar.gz galaxy.tar.gz models.tar.gz webserver.tar.gz
- Using deb file
- Download the deb file "OSDDlinux_base_to_full.deb" from the link given below
http://osddlinux.osdd.net/repo/OSDDlinux_base_to_full.deb
- Type following command in terminal to upgrade base version to full version
sudo dpkg -i OSDDlinux_base_to_full.deb
- Now your system is upgraded to OSDDlinux_full version with all the additional packages installed in the machine
- Using apt-get command
- open /etc/apt/sources.list file using following command
sudo vi /etc/apt/sources.list
- add following line (repository) at the bottom of the file
deb http://osddlinux.osdd.net/repo amd64/ for 64 bit systems
deb http://osddlinux.osdd.net/repo i386/ for 32 bit systems
If the line is already present in the file then ignore the step 2
- Run following command to update the repository
sudo apt-get update
- Run following command to upgrade to OSDDlinux_full
sudo apt-get install OSDDlinux_base_to_full
- Now your system is upgraded to OSDDlinux_full version with all the additional packages installed in the machine


